


 1. Diamond, Pearl, and Platinum.
1.1. Poké Radar.
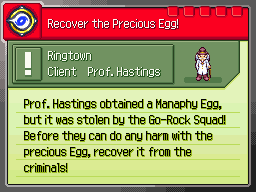
After seeing all the Pokémon from the Sinnoh Pokédex, Professor Rowan will reward you with a new device, the Poké Radar. This machine will greatly assist you while trying to find Shiny Pokémon, as it is the first real intended method of the franchise that increases the chance to find them.
How it works.
When activated while standing on a patch of grass, the Poké Radar will make some of the grass shake. These spots will always trigger a wild battle when stepped on. After defeating or catching one of those Pokémon, the Poké Radar will activate automatically once again, starting a reaction called chaining. In order to have higher chances to find a Shiny Pokémon, you will need to continue this chain, as the odds are modified with every step in the chain, up to a chain of 40, where the odds will be 1 in 199.

There are three different types of grass movements while using the Poké Radar: small movement (common Pokémon), a lot of movement and a small shine (40% chance for a rare Pokémon), and no movement with shining sparkles (the Pokémon will always be Shiny). This last one will be referred to as the Shiny patch. After being used, the Poké Radar will need to recharge by taking 50 steps.
It can only be used on grass while not riding the bicycle. The taller grass found in some parts of Sinnoh will not work. The things that will break the chain are:
-
Not defeating or catching the Pokémon found.
-
Finding a wild Pokémon without using the Poké Radar.
-
Finding a Pokémon from a different species.
-
Using the bicycle.
-
Moving away too far, leaving all of the shaking grass patches off-screen.
-
A Pokémon evolving or an egg hatching.
Activating the Poké Radar again while a chain is active will not break it. This is used to reset the grass patches.
Shiny chance.
Any shaking patch of grass has the regular 1 in 8192 chance to yield a Shiny Pokémon, even if the patch is not a shining one. The first use of this item will be counted as chain 0, and will never be able to yield a Shiny patch. Every time the chain is increased by one, the odds of finding a Shiny will be easier.
| Chain Length | Odds | Chain Length | Odds | Chain Length | Odds | Chain Length | Odds |
|---|---|---|---|---|---|---|---|
| 1 | 1/7132 | 11 | 1/5497 | 21 | 1/3770 | 31 | 1/1941 |
| 2 | 1/6971 | 12 | 1/5329 | 22 | 1/3592 | 32 | 1/1752 |
| 3 | 1/6810 | 13 | 1/5159 | 23 | 1/3413 | 33 | 1/1562 |
| 4 | 1/6649 | 14 | 1/4989 | 24 | 1/3232 | 34 | 1/1371 |
| 5 | 6487 | 15 | 1/4818 | 25 | 1/3051 | 35 | 1/1178 |
| 6 | 1/6325 | 16 | 1/4646 | 26 | 1/2869 | 36 | 1/985 |
| 7 | 1/6161 | 17 | 1/4473 | 27 | 1/2685 | 37 | 1/790 |
| 8 | 1/5996 | 18 | 1/4298 | 28 | 1/2501 | 38 | 1/595 |
| 9 | 1/5831 | 19 | 1/4123 | 29 | 1/2315 | 39 | 1/398 |
| 10 | 1/5664 | 20 | 1/3947 | 30 | 1/2129 | 40 | 1/199 |
After reaching a chain of 40, the Shiny odds won't change anymore. This is when you will reset the Poké Radar multiple times until a Shiny patch appears.
Poké Radar exclusive Pokémon.
There are some Pokémon that can't be found normally in the wild on Sinnoh, as they are native to other regions, but thanks to the Poké Radar, they can spawn. This means that normal wild encounters will not make them appear, while the shaking grass from the Poké Radar will.
| Pokémon | Location | Diamond | Pearl | Platinum |
|---|---|---|---|---|
 |
Route 201 | 20% | 2% | 6% |
 |
Route 201 | 2% | 20% | 6% |
 |
Route 221 and Valor Lakefront |
10% | 2% | 6% |
 |
Route 221 and Valor Lakefront |
2% | 10% | 6% |
 |
Route 229 | 2% | 2% | 2% |
 |
Route 229 | 20% | 20% | 20% |
 |
Routes 225 and 226 | 2% | 2% | 2% |
 |
Routes 225 and 226 | 20% | 20% | 20% |
 |
Route 205 (north) | - | 22% | 22% |
 |
Route 212 (south) | 22% | 22% | 22% |
 |
Route 209 | 20% | 2% | - |
 |
Route 210 (south) | 20% | 2% | 11% |
 |
Route 218 | 22% | 22% | - |
 |
Route 218 | 22% | 22% | 22% |
 |
Route 230 | 22% | 22% | 22% |
 |
Valley Windworks | 22% | 22% | 22% |
 |
Route 222 | 22% | 22% | 22% |
 |
Route 205 (north) | 22% | - | - |
 |
Route 205 (south) | 22% | 22% | 22% |
 |
Route 205 (north) | 2% | - | - |
 |
Route 204 (north) | 22% | 22% | 12% |
 |
Lake Valor and Lake Verity |
22% | 22% | 22% |
 |
Lake Acuity | 22% | 22% | - |
 |
Routes 214 and 215 | - | 22% | - |
 |
Route 207 | - | 22% | 22% |
 |
Route 208 | - | - | 12% |
|
Route 212 (north) | 12% | 12% | 12% |
 |
Route 208 | 12% | 12% | - |
 |
Route 211 (west) | 12% | 12% | 12% |
 |
Route 209 | 2% | 20% | - |
 |
Route 210 (south) | 2% | 20% | 11% |
 |
Route 207 | 22% | - | - |
 |
Route 214 | - | - | 12% |
 |
Route 214 | 22% | - | - |
|
Route 215 | 25% | - | - |
 |
Route 213 | 22% | 22% | 22% |
 |
Routes 203 and 204 (south) |
21% | 21% | - |
 |
Routes 203 and 204 | 1% | 1% | - |
 |
Route 209 | - | - | 12% |
 |
Eterna Forest | 22% | 22% | 22% |
 |
Mount Coronet exterior (summit) |
12% | 12% | 12% |
 |
Fuego Ironworks | 22% | - | 22% |
 |
Route 227 and Stark Mountain |
22% | 22% | 22% |
 |
Route 228 | 2% | 2% | - |
 |
Route 228 | 20% | 20% | - |
 |
Route 211 (east) | 2% | 22% | 22% |
 |
Route 206 | 22% | 22% | 22% |
 |
Route 210 (north) | 22% | - | - |
 |
Route 224 | 2% | 2% | - |
 |
Route 224 | 20% | 20% | - |
 |
Routes 216 and 217 | 22% | 22% | - |
 |
Route 210 (north) | - | 22% | 22% |
You can still full-odds hunt these Pokémon if you activate the Poké Radar and run away from the battles, although this process can be tedious as you need to recharge each time anyway.
In-depth guide.
In order to get a chain of 40 and have the best chance to find Shiny Pokémon, you will need a few things (aside from the Poké Radar itself):
-
A big number of repels to not find wild Pokémon, which can break the chain.
-
Pokétch app number 20: Trainer Counter. Given by Professor Oak on the Pal Park. This app will show your current chain, along with your top 3 highest chains.
-
A "catcher" Pokémon with moves like False Swipe and Spore. You can find some examples in the Utility Pokémon guide.
-
A decently large amount of Poké Balls.
Before jumping right into the chaining, read the whole guide first to have a better understanding of all the mechanics. First, you will need to follow these steps:
-
Go to the route of your choice and find a 9 x 9 grass area; bigger areas also work.
-
Use the repel, stand in the middle of the area, and save. Remember to select the Poké Radar as a shortcut to have quicker access to it.
-
Use the Poké Radar. You will see four patches of grass that will shake in different ways (as mentioned above). Go into one of them (try to remember the type of movement of the patch) and catch or defeat the Pokémon if it's the one you are looking for. If it's not, you can choose to reset the game to not waste repels and time, or recharge the Poké Radar and try again.
-
After the first battle is over, the Poké Radar will activate again. You will need to step into the patch of grass that has the same type of movement as the one you did in the previous step. For example, if you went for one that moved a lot and had a small shine, you will need to look for those for the rest of the chain.
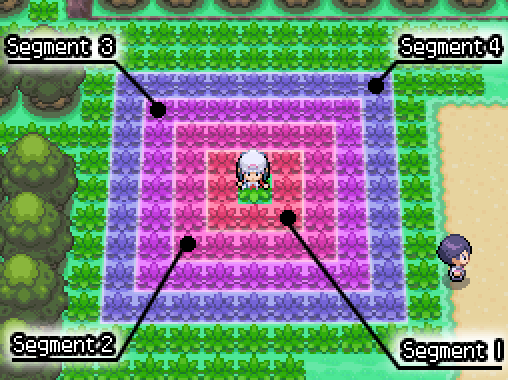
As you can see in the image, the Poké Radar divides the area around you into four segments. Each segment will have a maximum of one patch of grass activated by the Poké Radar. Learning these segments and being able to identify them is crucial for a successful chain. After you find your first Pokémon on the chain and new patches of grass start moving:
-
A patch on segment 1 has a 28% chance of having the same Pokémon you are chaining.
-
A patch on segment 2 has a 48% chance of having the same Pokémon you are chaining.
-
A patch on segment 3 has a 68% chance of having the same Pokémon you are chaining.
-
A patch on segment 4 has an 88% chance of having the same Pokémon you are chaining.
As you can see, focusing on segment 4 will yield the best results and is worth recharging the Poké Radar for, even if it takes a little more time. It's not a 100% chance to continue the chain, but there is a way to increase the chance even further: if you catch the Pokémon instead of defeating them, you will increase all segments' chances by 10%. This means that the grass on segment 4 will have a 98% chance to have the same Pokémon and continue the chain. If you recharge the Poké Radar, the chances will go back to the normal ones mentioned above.
This is where your approach will matter the most. If you decide to defeat each Pokémon, it's better to carry a Pokémon that knows moves with high PPs or multiple Leppa Berries. For catching, you will need a large amount of Poké Balls (Quick Balls and Ultra Balls are usually the best choices). For Pokémon with low catch rates (like Beldum) it's very time-consuming to catch each of them, so you may prefer to knock them out.
Recharging the Poké Radar is the safest option if a patch of grass of your type doesn't appear. If you always go for segment 4 patches and catch all Pokémon, it is likely that you will reach a chain of 40. After that, you don't need to keep increasing the chain; the Shiny odds won't change, so you can focus on running around (obviously avoiding the patches of grass and keeping the repels active) to recharge the Poké Radar until a Shiny patch appears.
After finding a Shiny patch and catching the Shiny Pokémon, you can keep going with the chain, as the odds don't get reset, letting you get multiple Shinies of the same species.
Tips and important information.
-
One way that your chain can be broken is if none of the tiles that were supposed to shake were grass tiles. Be cautious about the edges and corners. Make sure to have 8 tiles of grass surrounding you when the Poké Radar is activated, including after defeating a Pokémon. Another important thing to keep in mind, especially while recharging, is to not go too far away so the grass goes off-screen, as this will also break your chain.
-
If you don't see a patch of grass moving on segment 1, it is highly likely that it appeared on the tile behind your character's sprite (one tile up from your position). Be careful while walking; it is recommended to never step in that direction, just in case.
-
A patch of grass on segment 4 with no 10% catch bonus is still safer to take than a patch on segment 3 with the bonus.
-
For the beginning and while learning how to chain, go for the type of grass that is easier to spot for you. Don't chain on areas with snow or sand storms if it's your first time.
-
Do not force your eyes while chaining. Put the DS in sleep mode (this will not break the chain) and take breaks as needed. Remember to play in a well-lit place.
-
Avoiding the other type of patch gives you a better chance to keep the chain alive. If you happen to step into one of the opposite ones but the chain keeps going, you will now have to look for this new type.
-
While using the Pokétch app, you can see if your chain breaks just when the battle animation starts if the Pokémon disappears from the bottom screen.
-
Never take patches from segments 1 and 2.
-
Use Magnet Pull and Static if you are looking for steel- or electric-type Pokémon, respectively.
-
Chaining on a route where a roaming legendary Pokémon is currently present can break your chain with their encounter. For example, Mesprit.
-
Use Synchronize to have a 50% chance for the wild Pokémon to have the same nature as your Pokémon.
-
Some Pokémon know dangerous moves that will hit them back with recoil damage, KO them immediately, or end the battle (like Roar). Be prepared accordingly before starting a chain.
1.2. Great Marsh.
The Great Marsh takes on the role of the Safari Zone on Sinnoh, adding some new mechanics, specifically Pokémon that change each day. The place is divided into six areas, and each of them has a different special Pokémon depending on the day, chosen randomly. In order to check which is currently appearing, the 2nd floor of the entrance building has a lookout where you can pay 100 coins to see through the marsh. It will show you a sequence of areas and Pokémon that appear in them, but it won't always show the special spawn, so it may require a few tries.
These Pokémon have a 10% chance of appearing in the wild, and they get added to the encounter list by pushing down the encounter rate of other Pokémon, resulting in a clean 100%.
| Diamond and Pearl | Platinum | |
|---|---|---|
 |
 |
 |
| -5% | -5% | -10% |
If Wooper appears as the random Pokémon in Platinum, the encounter rate stays the same as always.
The list of Pokémon that appear in each game is:
| Diamond and Pearl | Platinum |
|---|---|


|


|
| Only before the National Pokédex | |


|

|
| Only after the National Pokédex | |


|


|
1.3. Double encounters.
During the playthrough, there are multiple locations where you will have to assist or be assisted by an NPC trainer. These characters will follow you as you traverse these places and will also join you during battles. This means that, if you were to find a wild Pokémon, a double battle would trigger instead, letting you encounter two Pokémon at once.
These NPCs go away after you are done with the task, so it is recommended that, if you are interested in the Shinies of any of the wild Pokémon in those areas, you hunt before you continue. This is especially true for the Eterna Forest: Cheryl will go away after escorting her to the other side of the forest, a mandatory task to continue with the game. The places where you can find double encounters are:
| Location | NPC | Pokémon owned | Notes |
|---|---|---|---|
| Eterna Forest |  Cheryl |
 |
Mandatory. You can't continue the story without crossing the forest with her |
| Wayward Cave |  Mira |
 |
Not mandatory |
| Iron Island |  Riley |
 |
Not mandatory |
| Victory Road |  Marley |
 |
Appears after obtaining the National Pokédex |
| Stark Mountain |  Buck |
 |
Appears after obtaining the National Pokédex |
You can only catch one Pokémon during a double battle, and you are able to knock out the NPC's Pokémon so they won't defeat a Shiny. Due to the way these encounters are made, if two Shiny Pokémon of the same species were to appear in the same encounter, the game would freeze.
1.4. Mass outbreaks.
After beating the Pokémon League and obtaining the National Pokédex, a swarm of Pokémon will start to appear every day. Each day, a Pokémon swarm will be selected and will last until the day is over. In order to know which swarm is currently active, you can talk with the opposite-gender protagonist's sister in Sandgem Town. These Pokémon can also be hunted with the Pokéradar.
Changing the DS date to get a new swarm will be detected, and in response, the swarm will be locked until 12:00 AM, but there is a workaround:
-
Go to Sandgem Town and check the current swarm as you normally would.
-
Save in front of the girl.
-
Reset the DS and enter the time configuration. Change the hour to 23:59.
-
Wait until the clock hits 0:00 (the next day).
-
Check the swarm, and if it's not your target, repeat from step 2. Remember to always save in the new day, or else the game will interpret it as the same day and give you the same swarm.
| Pokémon | Location | Game |
|---|---|---|
 |
Route 229 |
|
 |
Fuego Ironworks |
|
 |
Route 221 |
|
 |
Route 201 |
|
 |
Route 215 |
|
 |
Route 226 |
|
 |
Route 218 |
|
 |
Route 203 |
|
 |
Lake Valor |
|
 |
Route 229 |
|
 |
Route 224 |
|
 |
Route 208 |
|
 |
Route 209 |
|
 |
Route 217 |
|
 |
Route 230 |
|
 |
Route 216 |
|
 |
|
|
 |
Route 207 |
|
 |
Lake Acuity |
|
 |
Route 206 |
|
 |
Route 202 |
|
 |
Lake Verity |
|
 |
Eterna Forest |
|
 |
Route 225 |
|
 |
Route 206 |
|
 |
Route 222 |
|
 |
Valley Windworks |
|
 |
Route 214 |
|
 |
Route 227 |
|
 |
Route 213 |
|
 |
Route 228 |
|
1.5. Honey trees.
Honey is a new item introduced in this generation, with the same effect as Sweet Scent when it is used on grass. But that's not its important use. Through the region of Sinnoh, there are a few yellow-coloured trees called honey trees, and, as their name indicates, they are related to this new item, which you will be able to spread on them.
Six hours after coating one of these trees with honey, a Pokémon may appear when you interact with it. These Pokémon will always range from level 5 to level 15, and the species are chosen among a list of groups. The spawns will be determined by the type of honey tree.
There are 21 honey trees scattered around the region that fall into two categories: "normal" trees and "Munchlax" trees. Out of all of the trees, only 4 are of the Munchlax type, and they are calculated using your TID and SID, but that will be explained later on. Depending on the type, there will be different chances to find each Pokémon: they are present in 3 groups (A, B, and C), followed by a 4th group (D) with no Pokémon. The chance to find a Pokémon after 6 hours is 90% on normal trees, while it is 91% on Munchlax trees. An easy way to know if a tree is going to generate a Pokémon before waiting all that time is by interacting with it after using the Honey. If the dialogue box says "The bark is slathered with Honey…", it means that a Pokémon will appear. On the other hand, if it says "There is a sweet scent in the air...", the tree has generated a value that falls into Group D, giving no spawn at all. In this case, you can use Honey on it again and repeat the process.
But how are these groups different for each tree type? Normal trees have a 70% chance to have a Pokémon from Group A, a 20% chance from Group B, a 0% chance for Group C, and a 10% chance to not generate one (Group D). Because Group C only has Munchlax in it, normal trees will never generate a value that will result in that group. Meanwhile, Munchlax trees have a 20% chance for Group A, a 70% chance for Group B, a 1% chance for Group C, and a 9% chance of not having a Pokémon. Each Pokemon also has their own percentage of appearing inside the chosen group. This is better visualised in the following table:
| Diamond and Pearl | Platinum | All games | ||||||||||
|---|---|---|---|---|---|---|---|---|---|---|---|---|
| Normal tree | Group A | 70% | Group B | 20% | Group A | 70% | Group B | 20% | Group C | 0% | Group D | 10% |
| Munchlax tree | 20% | 70% | 20% | 70% | 1% | 9% | ||||||
| Pokemon 1 (40%) | No Pokémon spawn | |||||||||||
| Pokemon 2 (20%) |
|
|||||||||||
| Pokemon 3 (20%) | ||||||||||||
| Pokemon 4 (10%) | ||||||||||||
| Pokemon 5 (5%) | ||||||||||||
| Pokemon 6 (5%) | ||||||||||||
* Cascoon is exclusive to Pokémon Pearl, while Silcoon is exclusive to Pokémon Diamond.
After a Pokémon has been found and you decide to use Honey again on the same tree (before using it in any other tree in the region), you have to keep in mind that the tree will now have a 90% chance to have a Pokémon from the same group as the one you just found, while the other 10% will generate it randomly. For example, if your game is Platinum and you find a Wurmple (Group A) in a tree and, before checking any other tree, you slather Honey on that same tree again, there is a 90% chance that the next Pokémon will be from Group A as well. This can be used to your advantage if you are looking for Heracross (Group B): if you find a Cascoon or Silcoon (Diamond and Pearl) or a Wurmple (Platinum), which are all from Group A, you know for sure that the tree will have a really small chance to have Group B if you use Honey immediately. In this case, you can proceed with checking the next tree.
Munchlax.
As seen previously, Munchlax trees are rare among the limited number of honey trees, and even then, the low percentage makes finding Munchlax an extremely tedious task. The fact that the location of these trees is chosen using your TID and SID does not help to narrow it down.
If you are up to the task, you can check all 21 trees by hand, but if that's not in your plans, you can use this calculator. Luckily, even if you don't know your SID, two of the four trees can still be found with just the TID.


There is a minosculous chance that two of the Munchlax trees will fall into the same spot due to a bug, which means that there will only be three total Munchlax trees instead of four.
Combee and Vespiquen.
Even though Munchlax is the rarest Pokémon to find, it is not the hardest Pokémon to hunt. Combee has a 12.5% chance to be female and an 87.5% chance to be male. This in and of itself wouldn't be bad if it weren't for the fact that Combee only evolves into Vespiquen if it is female. This makes this hunt (in most cases) a very long, tedious process of potential phases piling up one after another, with only male Combees in your hands. The resets are still decently fast anyway, so the process is not as bad as it could be.


Do NOT use the Cute Charm ability thinking that it will increase your chances of finding the female, as this will only mess up your Shiny odds badly.
Burmy.
If you are interested in the concept of gender influencing the results of a hunt but intimidated by Combee's gender ratio, Burmy is a more forgiving hunt in this regard. Burmy's chance for either gender is 50/50, which potentially makes it easier to find a male one to evolve into Mothim. Even if you don't find a male one, a female Burmy can still evolve into Wormadam. While they are not the prettiest Shinies, you don't have to worry too much about duplicates, as both Burmy and Wormadam can be transformed into three different forms.


1.6. Trophy Garden.
Located in the north area of Route 212, inside Mr. Backlot's Pokémon Mansion, the Trophy Garden is a special area where rare Pokémon appear after obtaining the National Pokédex. These Pokémon change every day, and Mr. Backlot's himself will tell you which one is currently appearing.
To get the Pokémon that you want, go to Mr. Backlot's office (he will be standing next to his butler, and there's a policeman in the same room), and save the game before talking to him. He will mention the name of the Pokémon, and if you don't like it, you can reset the game to get a new one.


Only two Pokémon are version-exclusive: Porygon in Diamond and Pearl and Ditto in Platinum. All Pokémon are levels 16-22 and have a 5% chance to appear in the wild.
1.7. Dual-slot.
After obtaining the National Pokédex, a new feature involving the GBA slot of a DS or DS Lite will unlock. Diamond, Pearl, and Platinum will be able to recognise the current cartridge inserted in that slot and add new Pokémon to some routes. The games that activate this function are Ruby, Sapphire, Emerald, FireRed, and LeafGreen.
The DS game will only check for the GBA slot when the save file is loaded. The GBA cartridge can be removed after this. The new Pokémon will be available until the console is turned off.
Every Pokémon has an 8% chance to appear, unless stated otherwise.
| Pokémon | Location | Game |
|---|---|---|
| Ruby | ||
 |
Routes 203, 204, and 210 (South) Eterna Forest |
|
 |
Routes 210 (South) and 229 |
|
 |
Iron Island |
|
 |
Routes 208 and 210 (North) |
|
 |
Lake Verity, Lake Acuity, Lake Valor, Mt. Coronet, Sendoff Spring, and Turnback Cave |
|
| Sapphire | ||
 |
Routes 203, 204, 205 (North), and 212 (South) |
|
 |
Routes 212 (South) and 229 |
|
 |
Iron Island |
|
 |
Routes 208 and 210 (North) |
|
 |
Lake Verity, Lake Acuity, Lake Valor, Mt. Coronet, Sendoff Spring, and Turnback Cave |
|
| FireRed | ||
 |
Route 204 and Eterna Forest |
|
 |
Eterna Forest |
|
 |
Route 212 (South) |
|
 |
Great Marsh |
|
 |
Routes 201 and 202 |
|
 |
Route 205 and Valley Windworks |
|
| LeafGreen | ||
 |
Route 204 and Eterna Forest |
|
 |
Eterna Forest |
|
 |
Wayward Cave |
|
 |
Route 228 |
|
 |
Routes 209 and 214 |
|
 |
Route 227 and Stark Mountain |
|
| Emerald | ||
 |
Route 211, Acuity Lakefront, and Lake Acuity |
|
 |
Routes 216 and 217 Acuity Lakefront and Lake Acuity |
|
 |
Routes 203, 204, 210 (South), and 229 Eterna Forest |
|
 |
Routes 206, 207, 214, 215, and 227 Stark Mountain |
|
 |
Route 224 |
|
| Multiple games | ||
 |
Old Chateau (all games) |
|
 |
Old Chateau (all games) |
|
|
Lake Verity (FireRed, LeafGreen, and Emerald) |
|
|
Lake Verity (FireRed, LeafGreen, and Emerald) |
|
1.8. Special days and egg cycles.
There are some specific dates where the encounter rate and the egg hatch speed are modified. These dates mostly correspond to special days with significant historical events or festivities. For the encounters, there are two sets of days that increase them by 5% or 10% and another group that decrease them by 5% or 10%. The boosts and nerfs aren't too big, but it's still interesting to keep in mind their existence.
| Month | +5% days | +10% days | -5% days | -10% |
|---|---|---|---|---|
| January | 11 | 12 | - | 1 |
| February | 3, 11, 12 | - | - | - |
| March | 3, 17, 25 | - | - | 21 |
| April | 1, 25, 29 | - | - | - |
| May | 3, 5, 8, 28 | - | - | - |
| June | 2, 21 | - | - | - |
| July | 4, 14, 24 | 7 | - | - |
| August | 15, 28 | - | 13, 14 | 6, 9 |
| September | 15, 20 | - | - | 11, 23 |
| October | 3, 12, 30 | - | - | - |
| November | 1, 11, 16 | - | 3 | - |
| December | 6, 8, 23, 24 | - | 31 | - |
For the eggs, the following dates make them hatch 10% faster:
| Jan. 12 | Feb. 14 | March 3 | April 1 | May 1 | June 11 |
| July 7 | Aug. 21 | Sept. 28 | Oct. 31 | Nov. 21 | Dec. 24, 25 |
1.9. Received and interactable Pokémon.
| Pokémon | Level | Moves | Location | Notes |
|---|---|---|---|---|
| Received Pokémon | ||||
 |
5 | Tackle (35) Withdraw (40) |
Lake Verity (DP) Route 201 (Pt) |
Starter Chance for an uncacthable Shiny Starly in DP |
 |
Scratch (35) Leer (30) |
|||
 |
Pound (35) Growl (40) |
|||
|
Egg | Growl (40) Charm (20) |
Eterna City | Platinum exclusive. Given by Cynthia. After dealing with Team Galactic |
 |
5 | Tackle (35) Tail Whip (30) Helping Hand (20) |
Hearthome City | Diamond and Pearl. Given by Bebe. Requiresthe National Pokédex |
|
20 | Tackle (35) Sand Attack (15) Helping Hand (20) Growl (40) |
Hearthome City | Platinum. Given by Bebe |
 |
Egg | Pound (35) Minimize (10) Copycat (20) |
Hearthome City | Diamond and Pearl exclusive |
 |
25 | Magnet Rise (10) Recover (10) Agility (30) Psybeam (20) |
Veilstone City | Platinum exclusive. Given in a house north of the Pokémon Center |
 |
Egg | Quick Attack (30) Foresight (40) Endure (10) |
Iron Island | Riley gives it after finishing its trip in the island |
| Interactable Pokémon | ||||
 |
22 | Gust (35) Focus Energy (30) Payback (10) Stockpile (20) |
Valley Windworks | Diamond and Pearl. One every Friday |
 |
15 | Minimize (10) Astonish (15) Gust (35) Focus Energy (30) |
Valley Windworks | Platinum. One every Friday |
 |
25 | Feint Attack (20) Hypnosis (20) Dream Eater (15) Ominous Wind (15) |
Hallowed Tower (Route 209) |
After placing the Odd Keystone and meeting 32 people underground |
 |
15 (DP) 20 (Pt) |
Thunder Shock (30) Confuse Ray (10) Uproar (10) Double Team (15) |
Old Chateau (night) | Interacting with the TV. National Pokédex required in DP |
1.10. Legendaries.
| Pokémon | Level | Moves | Location | Notes |
|---|---|---|---|---|
| Diamond and Pearl | ||||
 |
47 | Metal Claw (35) AncientPower (5) Dragon Claw (15) Roar of Time (5) |
Spear Pillar | Diamond exclusive. Mandatory during the story. |
 |
47 | Water Pulse (20) AncientPower (5) Dragon Claw (15) Spacial Rend (5) |
Spear Pillar | Pearl exclusive. Mandatory during the story. |
 |
70 | Shadow Force (5) Heal Block (15) Earth Power (10) Slash (20) |
Turnback Cave | Altered Forme |
 |
50 | Confusion (25) Yawn (10) Future Sight (15) Amnesia (20) |
Lake Acuity | After dealing with the box legendary |
 |
50 | Confusion (25) Uproar (10) Future Sight (15) Nasty Plot (20) |
Lake Valor | After dealing with the box legendary |
 |
50 | Confusion (25) Lucky Chant (30) Future Sight (15) Charm (20) |
Roaming Sinnoh | After dealing with the box legendary |
 |
70 | Scary Face (10) Lava Plume (15) Fire Spin (15) Iron Head (15) |
Stark Mountain | After Buck returns the Magma Stone |
 |
50 | Mist (30) Aurora Beam (20) Future Sight (15) Slash (20) |
Roaming Sinnoh | After encountering it in Fullmoon Island |
 |
70 | Stomp (20) Confuse Ray (10) Superpower (5) Zen Headbutt (15) |
Snowpoint Temple | Having Regirock, Regice, and Registeel in the team |
 |
40 | Quick Attack (30) Hypnosis (20) Pursuit (20) Nightmare (15) |
Newmoon Island | Requires Member Card (never released in DP). Can be found through a glitch |
 |
30 | Defense Curl (40) Magical Leaf (20) Leech Seed (10) Synthesis (5) |
Flower Paradise (North of Route 224) |
Requires Oak's Letter (never released in DP). Can be found through a glitch |
 |
80 | Refresh (20) Future Sight (15) Recover (10) Hyper Beam (5) |
Hall of Origin (Spear Pillar) |
Requires Azure Flute (never released in DP). Can be found through a glitch |
| Platinum | ||||
 |
70 | Roar of Time (5) Heal Block (15) Earth Power (10) Slash (20) |
Spear Pillar | After beating the Pokémon League, talking to the old woman in Celestic Town, and obtaining the Adamant Orb |
 |
70 | Spacial Rend (5) Heal Block (15) Earth Power (10) Slash (20) |
Spear Pillar | After beating the Pokémon League, talking to the old woman in Celestic Town, and obtaining the Lustrous Orb |
 |
47 | Ominous Wind (5) AncientPower (5) Dragon Claw (15) Shadow Force (5) |
Distortion World | Mandatory during the story. Can be rebattled in Turnback Cave if it's not caught in the Distortion World (Altered Forme) |
 |
50 | Swift (20) Yawn (10) Future Sight (15) Amnesia (20) |
Lake Acuity | After dealing with the box legendary |
 |
50 | Swift (20) Uproar (10) Future Sight (15) Nasty Plot (20) |
Lake Valor | After dealing with the box legendary |
 |
50 | Swift (20) Lucky Chant (30) Future Sight (15) Charm (20) |
Roaming Sinnoh | After dealing with the box legendary |
 |
50 | Metal Sound (40) Crunch (15) Scary Face (10) Lava Plume (15) |
Stark Mountain | After beating Team Galactic at Stark Mountain and speaking with Buck in Battleground |
 |
50 | Mist (30) Aurora Beam (20) Future Sight (15) Slash (20) |
Roaming Sinnoh | After encountering it in Fullmoon Island |
 |
30 | Stomp (20) Rock Throw (15) Curse (10) Superpower (5) |
Rock Peak Ruins (Route 228) | Requires an event Regigigas in the team |
 |
30 | Stomp (20) Icy Wind (15) Curse (10) Superpower (5) |
Iceberg Ruins (Mt. Coronet) | Requires an event Regigigas in the team |
 |
30 | Stomp (20) Metal Claw (35) Curse (10) Superpower (5) |
Iron Ruins (Iron Island) | Requires an event Regigigas in the team |
 |
1 | Dizzy Punch (10) Knock Off (20) Foresight (40) Confuse Ray (10) |
Snowpoint Temple | Having Regirock, Regice, and Registeel in the team |
 |
50 | Hypnosis (20) Faint Attack (20) Nightmare (15) Double Team (15) |
Newmoon Island | Requires Member Card (event item) |
 |
30 | Growth (40) Magical Leaf (20) Leech Seed (10) Synthesis (5) |
Flower Paradise (North of Route 224) |
Requires Oak's Letter (event item) |
 |
80 | Refresh (20) Future Sight (15) Recover (10) Hyper Beam (5) |
Hall of Origin (Spear Pillar) |
Requires Azure Flute (never released in Pt). Can be found through a glitch |
 |
60 | Agility (30) Ice Beam (10) Reflect (20) Roost (10) |
Roaming Sinnoh | After obtaining the National Pokédex. Speak with Professor Oak in Eterna City |
 |
60 | Charge (20) Agility (30) Discharge (15) Roost (10) |
Roaming Sinnoh | |
 |
60 | Flamethrower (15) Safeguard (25) Air Slash (20) Roost (10) |
Roaming Sinnoh | |
1.11. Roamers.
Mesprit and Cresselia roam the region of Sinnoh, along with the Kanto birds (only in Platinum). The process to hunt the first two is very simple, so let's start with those. To prepare for the hunt:
-
Have a Pokémon with Illuminate leading your party. Make it level 50 if you want to use a repel trick so only Mesprit or Cresselia appear.
-
A Pokémon with Teleport. Abra can be easily found in the wild.
-
As a side note, Mesprit and Cresselia won't appear at the same time; each needs to be activated individually before they start roaming, so you can only activate one at a time and move on to the next one after it shines.
First, you will need to heal in a Pokémon Center that has grass nearby (like the one in Sandgem Town). This will keep your Teleport point there. Next, go to Lake Verity and save in front of Mesprit, or go to Newmoon Island and save in front of Cresselia, depending on your target. Make sure to use Max Repel before saving. This is where the hunt begins.
-
Talk to the Pokémon to activate it. Use Teleport to go back to Sandgem Town.
-
Walk back and forth between Sandgem Town and Route 202 while checking the position of the Pokémon on the Poketch map.
-
When it appears on Route 202, go into the grass and encounter it. If it's not Shiny, reset. Go back to step 1.
As for the Kanto birds, first you will need to obtain the National Pokédex and then prepare your team for the hunt. You will need something with Illuminate (like always) and a Pokémon that can outspeed all birds and defeat them in one hit. This Pokémon is up to you, but some examples are:
-
Palkia with Choice Specs (Lvl. 60, Modest) - Power Gem, Ice Beam - 252 EVs special attack.
-
Slaking with Silk Scarf/Choice Band (Lvl. 60, Adamant) - Giga Impact - 252 EVs attack.
-
Attack Forme Deoxys Choice Specs (Lvl. 60, Modest) - Thunderbolt, Ice Beam - 252 EVs special attack.
Now, for the steps to take for hunting them, you will first need to save in front of Professor Oak in Eterna City.
-
Talk to Professor Oak to activate the birds.
-
Go to Route 205 and back to Eterna City. Repeat this until one of them appears on this route. Defeat it if it's not Shiny.
-
Repeat step 2 until all birds are found. Reset the game and go back to step 1.
For catching, keep in mind to have a Pokémon with Shadow Tag or Mean Look so they don't run away. False Swipe and a sleep-inducing move also helps. Bring Taunt or Heal Block for the Kanto birds, as they all know Roost.
 2. Heart Gold and Soul Silver.
2.1. Starters.
Just like in the original Johto games, the starter Pokémon also need a special mention in these remakes, although this time it's not a negative aspect.


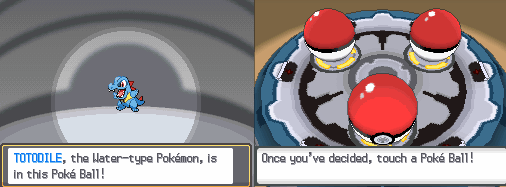
During the scene where Professor Elm gives the starter choice, the protagonist will approach some kind of machine that seems to be holding the three Pokémon. A menu will appear, showing the Poké Balls on the bottom screen and a sprite of the Pokémon on the top screen, letting you swap between them. Uusally, you would need to select one of them and then check your party to see if they are Shiny, but this time you will be able to check all three at the same time in this scene before even having to choose. This means that you are checking three potential targets at the same time for each reset, which makes this one of the most beginner-friendly full-odds hunts.
2.2. Game Corner.
Purchasing Pokémon with Game Corner coins is back in these games. This time around, the slot machines were replaced in the international versions with Voltorb Flip, while Japan kept the original concept. Exchanging money for these gambling coins is still available, though.
Voltorb Flip is a new minigame that involves a little bit more skill than the slot machines, but you can use this calculator and it will result in a win almost every time. Still, if you decide to learn how to play it, it can be fun and it puts your mind to work. On the other hand, Japanese copies still have the normal slot machines.
As for the Coin Case, it got a significant upgrade from the max of 9999 to up to 50,000 max coins. This will let you hunt every target, buying five at once, no matter their cost.
| Pokémon | Level | Coins | Game | |
|---|---|---|---|---|
| Goldenrod | ||||
 |
15 | 200 |
|
|
 |
15 | 700 | ||
 |
15 | 700 | ||
 |
15 | 2100 |
|
|
| Celadon | ||||
 |
15 | 3333 |
|
|
 |
15 | 6666 |
|
|
 |
15 | 9999 |
|
|
2.3. Pokéwalker.
A small device with a Poké Ball shape was released alongside HeartGold and SoulSilver. Its main function is to take your Pokémon on a walk, sending them directly from the cartridge into the Pokéwalker, where you will be able to keep track of your steps taken, search for wild Pokémon or items, and obtain Watts.
Every 20 steps, 1 Watt is received, which will be sent later on to the main game to unlock new routes to walk your Pokémon in. These routes are home to multiple types of Pokémon, which you can catch and send to HGSS as well. The device has a limit of 3 Pokémon per walk that you can store, just like the items. Getting one extra over that limit will make you replace one of them if you wish to keep it.
The IVs and personality values are generated when the caught Pokémon are transferred to the console. This means the nature is given randomly as well. When it comes to hunting, it sadly does not mean that the Pokémon will also have a chance to be Shiny, as they are locked to always be normal. The only way to obtain a Shiny from the Pokéwalker is by modifying the game with external hardware or cheats.
2.4. Hoenn / Sinnoh Sound.
One of the functions that comes back in these remakes is the Pokégear Radio. The number of radio programs has also been expanded, but, in this case, the focus is once again on Pokémon Music. Aside from the songs that it already had, in this instance, two new ones were added: Hoenn and Sinnoh sounds.
The Pokémon League must have been beaten and the National Pokédex obtained in order to unlock these songs. Every Wednesday, Hoenn Sound will be playing, while Sinnoh Sound takes the spot every Thursday. The themes are originally from Route 101 (Hoenn) and Route 201 (Sinnoh). But here's the important part about this new feature: it modifies the pool of Pokémon that can appear in the wild in some locations, adding Pokémon originally found in the Hoenn and Sinnoh regions depending on the day. The only exception to this rule is Meditite, which appears with the other Sinnoh spawns while being a Hoenn Pokémon.
| Hoenn Sound | Sinnoh Sound | Location |
|---|---|---|
 |
 |
Sprout Tower, Bell Tower, and Burned Tower |
 |
 |
|
 |
 |
Routes 4, 6, 9, 10, 13, 21, 22, 24, 25, 26, 27, 28, 30, 31, 32, 34, 35, 42, 43, 44, 45, 47, Ruins of Alph, and Mt. Silver |
 |
 |
|
 |
 |
Slowpoke Well, Union Cave, Mt. Mortar, Dark Cave, Whirl Islands, Mt. Silver Cave, Ice Path, Cliff Cave, Diglett's Cave, Mt. Moon, Cerulean Cave, Rock Tunnel, Seafoam Islands, Victory Road, Tohjo Falls |
 |
 |
|
 |
 |
Routes 1, 2, 3, 5, 7, 8, 11, 14, 15, 16, 17, 18, 29, 33, 36, 37, 38, 39, 46, 48, and National Park |
 |
||
 |
 |
Ilex Forest and Viridian Forest |
 |
 |
2.5. Soft-lock Tentacool.
Water-bound masses of land in Pokémon games are usually the perfect spot to get soft-locked, and this game would be no less. This time, the location is Cianwood City. If you manage to be in this city with only one Pokémon that isn't able to learn Surf, you will have successfully soft-locked yourself. Or so it was thought until 2020.
It was discovered that an NPC in the Cianwood Pokémon Center gifts the player (out of pity) a Tentacool if the game detects that there's only one Pokémon left that can't learn Surf. The intention of this was to create a way to exit Cianwood and remove the soft lock by teaching this Tentacool Surf. This NPC will give another Tentacool as long as the previous condition is met.


As this is a Pokémon received through a gift, it can also be hunted. It doesn't have any special moves or items, but the method needed to obtain it makes it stand out from any other normal Tentacool.
2.6. Safari Zone.
The Johto Safari Zone is a bit different from all the others. The first big change is the area system, where you are able to have six different areas that you are able to swap as you please. The biomes you can setup in each area will have Pokémon related to that habitat. The list of Pokémon can be expanded upon by placing blocks, which are decorations that will attract new Pokémon. For example, Lotad will start appearing in the Plains area after placing 12 Waterside blocks. Each area can hold a total of 30 blocks, but some Pokémon will require a larger amount of blocks. This is where upgrading comes into play.
| Block | Type | Block | Type | Other blocks |
|---|---|---|---|---|
 Shrubbery |
Plains |  Small Rock |
Peak |


.png) .png)

|
 Red Flower |
 Big Rock |
|||
 White Flower |
 Mossy Rock |
|||
 Tree |
Forest |  Puddle |
Waterside | |
 Stump |
 Fountain |
|||
 Branches |
 Water Hole |
The blocks listed under the "other" type don't influence the Pokémon in the area. As the days pass, the areas will be upgraded. Each upgrade will act as a multiplier for the number of blocks. For example, placing a block will make it count as 1 block (obviously), but an upgrade will make it count as 2 blocks instead; two upgrades will make it count as 3, and so on.
| Block multiplier | Days | |||
|---|---|---|---|---|
| Plains blocks | Forest blocks | Peak blocks | Waterside blocks | |
| x1 | 0 to 10 | 0 to 20 | 0 to 30 | 0 to 40 |
| x2 | 10 to 50 | 20 to 60 | 30 to 70 | 40 to 80 |
| x3 | 50 to 100 | 60 to 110 | 70 to 120 | 80 to 130 |
| x4 | 100 to 140 | 110 to 150 | 120 to 160 | 130 to 170 |
| x5 | 140 to 200 | 150 to 210 | 160 to 220 | 170 to 230 |
| x6 | 200 to 250 | 210 to 250 | 220 to 250 | 230 to 250 |
| x7 | 250+ | 250+ | 250+ | 250+ |
So, for example, to make Nosepass appear in the Meadow area, you need 35 Peak blocks, which is higher than the 30 block limit. This means you will need a minimum of 18 Peak blocks and wait 30 days to obtain their x2 multiplier, making for a total of 36. The problem is that, as you may have guessed, the game does not let you skip days with the DS clock. But there is a way to circumvent this limitation, although it can be a very long process.
This process is known as the DS initialization method. It is very simple to follow, but it is also very important to do the steps correctly. You will need a small Phillips screwdriver and a DS or DS Lite. The screwdriver can be found for cheap in a lot of online stores. As for the game, you will need to have unlocked the blocks and have a few of the following berries: Rabuta, Nomel, Cornn, and Magost. The thing they have in common is that they take 24 hours to grow, which will be important later on. The easiest of them to find are Nomel and Cornn, which can be exchanged in Fuchsia City for a yellow and blue shard, respectively. Keep in mind before starting the process that you will have to wait 24 hours in real life during the guide. The steps to take are as follows:
-
Set up the Safari areas, save the game, and turn off the DS.
-
Open the DS battery case with the screwdriver, remove the battery with a plastic tab, and wait a few seconds. Put the battery back in place and close the cover. Turn on the DS.
-
The DS will ask you to configure it. Set the date to December 31, 2099, and the time to 23:58.
-
Turn the DS on and wait on the menu until the time goes over 0:00 and the date goes back to January 1, 2000. Open the game.
-
Plant the berry, assign the planter, and save. Wait at least 24 hours (no less).
-
After the time is up, open the game and check the berry. If it can yield berries, let it be and save the game.
-
Turn off the DS and repeat steps 2 and 3 (you can set the time a few minutes earlier to give you some breathing room for the next step, 23:56, for example).
-
Turn on the game and check the berry again. If it disappeared, save the game quickly and turn off the DS. This has to be done before 23:59.
-
Go back into the game and check the Safari Zone. The Pokémon you are looking for should be appearing now.
If the berry did not disappear in step 8, repeat from step 6. Check out this video if you want a visual guide to this process.
As an example of what you can find in the Safari Zone, these are some of the most block-demanding targets, or popular and interesting ones:


2.7. Received and Interactable Pokémon.
| Pokémon | Level | Moves | Location | Notes |
|---|---|---|---|---|
| Received Pokémon | ||||
|
5 | Tackle (35) Growl (40) |
New Bark Town | Starter. All three can be hunted at the same time |
|
Tackle (35) Leer (30) |
|||
|
Scratch (35) Leer (30) |
|||
 |
Egg | Growl (40) Charm (20) Extrasensory (30) |
Violet City's PokéMart | After beating Falkner (first gym) and getting a call from Professor Elm |
|
5 | Leer (30) Tackle (35) Helping Hand (20) |
Bill's house (Goldenrod City) |
After speaking with Bill in Ecruteak City |
 |
Egg | Tackle (35) | Violet City |
Primo will give them by introducing a code that depends on your TID. It can be generated here |
 |
Water Gun (25) Tail Whip (30) |
|||
 |
Yawn (10) Smog (20) |
|||
 |
10 | Tackle (35) Helping Hand (20) Fake Out (10) Foresight (40) |
Mt. Mortar | After beating the Karate King |
|
15 | Extremespeed (5) Thunder Wave (20) Twister (20) Dragon Rage (10) |
Dragon's Den | After answering all the elder's questions correctly. Answering wrong will give a Dratini with Leer instead of Extremespeed |
 |
5 | Tackle (35) Growl (40) |
Professor Oak's Lab in Pallet Town | After obtaining all 16 badges and beating Red. Can only choose one |
 |
Scratch (35) Growl (40) |
|||
 |
Tackle (35) Tail Whip (30) |
|||
 |
5 | Pound (35) Leer (30) |
Silph Co. In Saffron City | Given by Steven Stone. After obtaining all 16 badges and beating Red. Can only choose one |
 |
Scratch (35) Growl (40) |
|||
 |
Tackle (35) Growl (40) |
|||
| Interactable Pokémon | ||||
 |
20 | Flail (15) Low Kick (20) Rock Throw (15) Mimic (10) |
Route 36 | Mandatory in order to continue the story. Requires the SquirtBottle |
 |
20 | Confuse Ray (10) Ice Shard (30) Water Pulse (20) Body Slam (15) |
Union Cave's basement | One every Friday |
 |
21 | Smog (20) Smokescreen (20) Assurance (10) Selfdestruct (5) |
Team Rocket HQ | As a hidden trap. Remember to bring a Pokémon with the Damp ability |
 |
23 | Spark (20) Rollout (20) Screech (40) Light Screen (30) |
||
 |
21 | Rock Polish (20) Rock Throw (15) Magnitude (30) Selfdestruct (5) |
||
 |
23 | Spark (20) Rollout (20) Screech (40) Light Screen (30) |
Three appear during the story on B2F. Will respawn immediately if you run away |
|
 |
50 | Block (5) Rollout (20) Crunch (15) Giga Impact (5) |
Vermilion City, blocking the Diglett's Cave entrance |
Requires the PokéFlute station from the Radio Expansion |
2.8. Legendaries.
| Pokémon | Level | Moves | Location | Notes |
|---|---|---|---|---|
| Received Pokémon | ||||
 |
45 | Extrasensory (30) Rain Dance (5) Hydro Pump (5) Aeroblast (5) |
Whirl Islands | SoulSiver only. Requires Tidal Bell and Silver Wing, both obtainable during the story |
|
70 | Aeroblast (5) Punishment (5) Ancientpower (5) Safeguard (25) |
Whirl Islands | HeartGold only. Requires Silver Wing, received in Pewter City from an old man next to the PokéMart |
 |
45 | Extrasensory (30) Sunny Day (5) Fire Blast (5) Sacred Fire (5) |
Bell Tower | HeartGold only. Requires Clear Bell and Rainbow Wing, both obtainable during the story |
|
70 | Sacred Fire (5) Punishment (5) Ancientpower (5) Safeguard (25) |
Bell Tower | SoulSilver only. Requires Rainbow Wing, received in Pewter City from an old man next to the PokéMart |
 |
40 | Rain Dance (5) Gust (35) Aurora Beam (20) Mist (30) |
Route 25 | Needs to be chased down before it can be battled. Found at these locations: -Burned Tower. -North of Cianwood City. -Route 42, near Mt. Mortar entrance. -Vermillon City. -Route 14. -Route 25, where it will be battled. |
 |
40 | Roar (20) Fire Spin (15) Stomp (20) Flamethrower (15) |
Roaming the region | |
 |
40 | Roar (20) Quick Attack (30) Spark (20) Reflect (20) |
||
 |
50 | Ancientpower (5) Agility (30) Ice Beam (10) Reflect (20) |
Seafoam Islands | |
 |
50 | Ancientpower (5) Charge (20) Agility (30) Discharge (15) |
Power Plant | |
 |
50 | Ancientpower (5) Flamethrower (15) Safeguard (25) Air Slash (20) |
Mt. Silver Cave | |
 |
70 | Psycho Cut (20) Amnesia (20) Power Swap (10) Guard Swap (10) |
Cerulean Cave | |
 |
50 | Aqua Ring (20) Ice Beam (10) Ancientpower (5) Water Spout (5) |
Embedded Tower (Route 47) | HeartGold exclusive. Requires the Blue Orb, received from Mr. Pokémon after obtaining all badges, beating Red, and getting the Kanto starter from Prof. Oak |
 |
50 | Rest (10) Earthquake (10) Ancientpower (5) Eruption (5) |
SoulSilver exclusive. Requires the Red Orb, received from Mr. Pokémon after obtaining all badges, beating Red, and getting the Kanto starter from Prof. Oak |
|
 |
50 | Rest (10) Air Slash (20) Ancientpower (5) Outrage (15) |
Requires the Jade Orb, given by Prof. Oak while having the Embedded Tower Kyogre and Groudon in your team |
|
 |
1 | Dragonbreath (20) Scary Face (10) |
Sinjoh Ruins | Requires an Arceus to activate the event. Find more info in its own section below |
 |
Dragonbreath (20) Scary Face (10) |
|||
 |
Dragonbreath (20) Scary Face (10) |
|||
 |
40 | Protect (10) Refresh (20) Luster Purge (5) Zen Headbutt (15) |
Pewter City | Enigma Stone WiFi Latios event for HeartGold. Bring the item to the Pewter City Museum, where you will meet Steven Stone |
|
35 | Dragonbreath (20) Protect (10) Refresh (20) Luster Purge (5) |
Roaming the region | SoulSilver exclusive. After obtaining the National Pokédex and exiting the Vermillon City Pokémon Fan Club |
 |
40 | Water Sport (15) Refresh (20) Mist Ball (5) Zen Headbutt (15) |
Pewter City | Enigma Stone WiFi Latias event for SoulSilver. Bring the item to the Pewter City Museum, where you will meet Steven Stone |
|
35 | Dragonbreath (20) Refresh (20) Mist Ball (5) Zen Headbutt (15) |
Roaming the region | HeartGold exclusive. After obtaining the National Pokédex and exiting the Vermillon City Pokémon Fan Club |
2.9. Roamers.
There are multiple in these games, but the process to hunt them is luckily very straight-forward and simple to follow. First, we will start with the original Johto Roamers: Raikou and Entei.
To prepare for the hunt, a few Pokémon and items will be needed to make it a smooth journey:
-
A Pokémon that increases the number of wild encounters. There are a few possible Pokémon, depending on the availability of other consoles:
-
If you have a second DS with another Generation 4 game, you can trade any Pokémon that has Illuminate as its ability.
-
If you don't have a second DS but have the Poké Walker: Beautiful Beach is one of the first routes to unlock (200 watts), and it is home to Staryu, one of the Pokémon with the Illuminate ability. It takes 5000 steps for it to start spawning rarely (3750 steps if you take a walk with a grass, electric, or dragon-type Pokémon). This method may require more grinding, as Staryu is not guaranteed to have that ability.
-
If you don't have either of the previous ones, Machop can appear on Mt. Mortar. It can have the No Guard ability, which increases the number of encounters by 50%. This increase is not as high as Illuminate, but it does the job well enough.
Make sure that the Pokémon that will make the encounters more likely are on the lead spot of the team and have fainted
-
-
A Pokémon that can defeat Entei and Raikou in one hit. They share a ground-type weakness.
An Adamant Mamoswine with EVs in attack and Earthquake is the best thing you can use, as it will need to be a level 40 Pokémon for the repel trick. If trading is not an option, Graveler is the best thing available, but it will need all of the attack training and boosts you can give it.
-
A Escape Rope and as many Max/Super Repels as you can.
The process to hunt them goes as follows:
-
Stand on top of the first set of stairs after going into the basement of the Burned Tower. Use a repel and save.
-
Take one step and watch the scene. Use the escape rope when Eusine leaves.
-
Go to Route 37. Go down through the patch of grass, and then go back up to Ecruteak City. Repeat until a Roamer appears.
-
Defeat the Roamer if it's not Shiny and continue repeating step 3 until the second is found. Soft reset if it's not Shiny either, and go back to step 2.
And that's pretty much it. The whole tediousness of the hunt comes from the fact that you have to deal with the entire cutscene at the beginning and reactivate the repels.
Now, for Latios and Latias, you will need to complete these tasks to prepare for the hunt:
-
Beat Red and get the Kanto starter from Professor Oak. Beat all the trainers from Routes 5, 6, 7, and 8. Talk to the Copycat in Saffron City.
-
Have a Pokémon with Cut and Rock Climb (Sandshrew or Ursaring, for example).
-
A fainted Pokémon with Illuminate leading the party. A level 35 Pokémon in the second spot.
-
Buy some Max Repels.
Then you will need to go to the Pokémon Fan Club, located in Vermillion City. Don't step outside after entering, or else the Roamer event will start. Make sure to use a repel and save before going out. The process to hunt them will then be:
-
Go outside and talk with Steven.
-
Walk between Vermillion City and Route 6 until the roamer is on Routes 5, 6, 7, or 8.
-
If it appears on Route 6, you can just step into the grass. For Route 5, you will go through the Underground Path on Route 6 and then use Rock Climb to reach the grass. To reach Routes 7 or 8, you can just go through Saffron City (Route 8 requires Cut to reach the grass).
-
Reset the game and repeat from step 1 if it's not Shiny.
In order to catch any of these roamers, it's recommended to use a Pokémon with Shadow Tag or Mean Look so they don't run away. Make sure to bring something to lower its HP and put it to sleep.
2.10. Sinjoh Ruins.
Located far north, off-limits from Johto, the Sinjoh Ruins is a mysterious place of which much isn't known (lore-wise). Some nomad inhabitants of Johto and Sinnoh created a tribe in ancient times where their cultures met each other. One example of this is how the ones coming from Johto believed eggs to be where life begins, while the others put Arceus as the origin. Either way, they decided to make a temple in honour of Arceus and the Unown, as they could see a correlation between both.
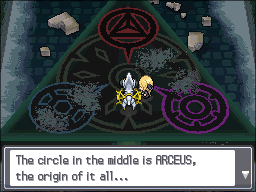
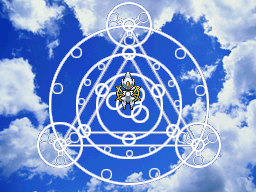
This place is only reachable if you have an Arceus in your team and go to the Ruins of Alph, specifically the Ruins Research Center. A small scene will play, after which you will be taken to this new location. There is not much to see other than a cabin and the Mystri Stage. If your only Pokémon on the team is Arceus, you will be let in to see a triangular stage with multiple symbols on the floor and three circles. Here you must choose one of them, each representing a different Pokémon: the left circle being Dialga, the right being Palkia, and the top one being Giratina.

The cutscene that plays during this event is worth watching on your own, as there is nothing alike seen before in a Pokémon game. After everything is done, you will be teleported back to the Ruins of Alph, but now with an egg in your team this time, which contains the chosen legend. They will be holding their signature items (Adamant Orb for Dialga, Lustrous Orb for Palkia, and Griseous Orb for Giratina).
This event is very unique in the way that it gives you the chance to Shiny hunt Dialga, Palkia, and Giratina at level 1.
| Sinjoh Ruins | ||
|---|---|---|
|
|
|
 |
 |
 |
| Level 1 | ||
| Dragon Breath (20) Scary Face (10) |
||
 3. Other information.
3.1. DNS exploit.
One of the biggest advancements in Pokémon distribution was the inclusion of the Nintendo WFC on the DS consoles, the perfect solution to the local-bound events of the past. This meant that everyone would be able to be part of these events without having to travel. Of course, there were still some local distributions, but it was a big step in the right direction. Years later, long after the DS time passed and the 3DS was the main console, Nintendo pulled the plug on the DS WFC servers and all games lost their online capabilities, which prompted groups of users to take action and make their own fan-made servers to fix this issue. The reason why this is relevant is that, because of this, we are able to receive these events even if they finished more than a decade ago. Some of these events include Shiny Pokémon or indirectly give you access to some hunts like the Sinjoh Ruins (event Arceus) or the Regis in Platinum (event Regigigas).
So how can you exactly receive these events without hacking or adding modifications to your games or consoles? To put it simply, a bug was found in Nintendo's software that can be used to make the DS systems trust a fan-made server as it would with the original Nintendo server, letting us connect as if nothing had changed at all, including normal online play like the GTS. Wimmfi replicates the same functionality as the servers owned by Nintendo. Just by fiddling with the DNS server option in the WFC configuration, a proxy server will redirect you to the Wimmfi trusted servers, and the world of online play is back in your hands once again. For a more technical explanation of how this all works, check the official Kaeru WFC website or their Github page. As for the thing that we're all here for, one of these fan servers lets you connect to the Mystery Gift system and receive the events in a random manner. This works for all Generation 4 and 5 games.
The following steps explain how to configure your game to receive the Mystery Gifts in Generation 4 games. For Black, White, Black 2, and White 2, check the DNS section of the Generation 5 guide.
First, there are a few things that are important to know. The Generation 4 games are only compatible with access points running on the 2.4 GHz band with security settings that are compatible (unsecured or WEP). Most Wi-Fi routers don't support WEP security anymore and usually work on the 5 GHz band. Although you can edit yours, it's not recommended to mess around with router configurations if you don't know what you're doing. If you are knowledgeable in this topic, you will probably know by now how to do that (setting up a WEP/unsecured connection in your router and whitelisting your DS' MAC address), so this guide will only talk about the easiest, most accessible route: a mobile phone hotspot.
To set up a compatible access point, you will have to access your phone’s configuration. The hotspot option is usually located in the “Network and Internet” section. Make sure the connection is set at 2.4 GHz and security is off. The most important step is to turn the “Hide network” setting on so no one else sees your access point. From here, you will need to follow these steps to configure your game:
-
In the main menu of the game (after the title screen), access the Nintendo WFC settings.
-
Select one of the connection slots (a new, empty one is recommended) and go into “Manual Setup”.
-
In SSID, set the name of your phone’s access point. Scroll down to “Auto-obtain DNS” and set it to “No”. Set “Primary DNS” to 167.86.108.126.
-
Test the connection and save the settings. Use the Wimmfi error code lookup page if you have persistent issues.
As a side note, you can also do this on a DSI or a 3DS, but you will have to go through the system settings.
-
DSI: go to System Settings and select “Internet”.
-
3DS: go to System Settings, select “Internet Settings”, and then “Nintendo DS Connections”.
Now that the connection is working, there’s only one step left: activating Mystery Gift. If you have already done this, you can skip it.
-
DPPt: must be activated by saying the correct words to a man on the third floor of Jubilife TV. The words are different in each language:
Language Password English EVERYONE HAPPY Wi-Fi CONNECTION Spanish CONEXIÓN Wi-Fi TODOS FELICES Italian CHIUNQUE FELICE Wi-Fi CONNECTION German ALLE GLÜCKLICH Wi-Fi CONNECTION French TOUS HEUREUX CONNEXION Wi-Fi Japanese みんな ハッピー Wi-Fi つうしん Korean 모두 두근두근 Wi-Fi 통신 -
HGSS: unlocks automatically after obtaining the Pokédex.
You will be able to receive gifts through the Nintendo WFC connection. It offers events randomly which you can choose to accept or not, and can still offer events that you have already received, but won’t let you get it again.
You can currently receive the following events:
| Diamond, Pearl, and Platinum | ||
|---|---|---|
| Pokémon | Event | Notes |
 |
Summer 2010 | Can be traded to HGSS to obtain the Pokéwalker route “Night Sky’s Edge” |
 |
Winter 2011 | Can be traded to HGSS and grants access to a time travel event in the Ilex Forest to battle Giovanni. Can be transfered to Generation 5 to obtain a Zorua |
 |
VGC 2009 | |
 |
Gamestop Suicune | Can be transfered to Black and White to start the Zoroark event in Lostlorn Forest |
 |
Gamestop Entei | |
 |
Gamestop Raikou | |
 |
Spring 2010 | Can be traded to HGSS to find the special Spiky-eared Pichu |
 |
2010 World Championship | |
 |
Phantom Champion Zoroark – Ash’s Pikachu | |
 |
Phantom Champion Zoroark – Goone’s Scizor | |
 |
Toys “R” Us USA Regigigas | Can be traded to Platinum to find all three Regis for hunting |
|
Summer 2009 | Similar to the Japanese movie Regigigas event |
 |
GameStop 2008 Deoxys | Change its form in Veilstone City |
 |
Toys “R” Us 2009 | Can be traded to HGSS to start the Sinjoh Ruins event and hunt Dialga, Palkia, and Giratina |
 |
JB Hi-Fi Manaphy | |
|
Toys “R” Us 2007 Manaphy | |
|
Nintendo World Store Manaphy | |
 |
2009 World Championship | |
|
2008 World Championship | |
 |
Alamos Darkrai | |
 |
Toys “R” Us 2009 Shaymin | |
 |
Toys “R” Us 2008 Dragonite | Level 50; 5 levels below its normal evolution level |
|
Nintendo Zone Pikachu | Knows the exclusive move Present |
 |
Secret Key distribution | Platinum only. Key item. Opens up Rotom appliances room |
 |
Member Card distribution | Key item. Grants access to Newmoon Island (Darkrai hunt) |
 |
Oak’s Letter distribution | Key item. Grants access to Seabreak Path and Flower Paradise (Shaymin hunt) |
 |
Unofficial Azure Flute distribution | Key item. Never released officially. Grants access to the Hall of Origin (Arceus hunt) |
| Pokétch App Matchup Checker |
Matchup Checker | Event-exclusive in DP. Obtainable in-game in Platinum |
| Pokétch App Alarm Clock |
Unofficial Alarm Clock | Unreleased officially |
| Heart Gold and Soul Silver | ||
|---|---|---|
| Pokémon | Event | Notes |
|
Winter 2011 Suicune | Can be transfered to Black and White to start the Zoroark event in Lostlorn Forest |
|
Winter 2011 Entei | |
|
Winter 2011 Raikou | |
 |
Winter 2011 Celebi | Grants access to a time travel event in the Ilex Forest to battle Giovanni. Can be transfered to Generation 5 to obtain a Zorua |
 |
2010 World Championship | |
 |
Phantom Champion Zoroark – Ash’s Pikachu | |
 |
Fall 2010 Mew | |
 |
Summer 2010 | Grants access to the Pokéwalker route “Night Sky’s Edge” |
|
VGC 2010 Eevee | |
 |
Enigma Stone distribution | Key item. Take to the Pewter Museum of Science to start a Latios/Latias event (can be hunted) |
| Amity Meadows Pokéwalker route |
Amity Meadows | |
| Rally Pokéwalker route |
Rally | |
| Sightseeing Pokéwalker route |
Sightseeing | Home to the only starter Pokémon in the wild in any game before Generation 6 (Torchic) |
| Yellow Forest Pokéwalker route |
Yellow Forest | Home to some special Pikachu with moves like Fly or Surf |
| Winner’s Path Pokéwalker route |
Winner’s Path | |
 |
Unofficial Lock Capsule distribution | Unreleased officially. Useless item in Generation 4. Trade to Black and White to obtan TM95 (Snarl) |
Japanese cartridges have the following events:
| All games (Japanese) | ||
|---|---|---|
| Pokémon | Event | Notes |
 |
2009 Birthday Chimchar 2010 Birthday Chimchar | |
 |
2009 Birthday Charmander 2010 Birthday Charmander | |
|
2009 Birthday Pikachu | Knows Surf |
|
7-Eleven Pikachu | Knows Present |
|
2010 World Championship Crobat | |
|
Cinema Celebi | Grants access to a time travel event in the Ilex Forest to battle Giovanni. Can be transfered to Generation 5 to obtain a Zorua |
|
Crown Beasts | Can be transfered to Black and White to start the Zoroark event in Lostlorn Forest |
|
||
|
||
|
Ario Pikachu | Knows Present |
|
Kyoto Cross Media Experiemce 2009 Pikachu |
Knows Present and Last Resort |
| Heart Gold and Soul Silver exclusive (Japanese) | ||
|---|---|---|
| Pokémon | Event | Notes |
|
2010 World Championships Eevee | |
| Diamond, Pearl, and Platinum exclusive (Japanese) | ||
|---|---|---|
| Pokémon | Event | Notes |
|
2009 World Championships Weavile | |
|
Cinema Arceus | |
|
Shokotan Pikachu-colored Pichu | Can be traded to HGSS to find the special Spiky-eared Pichu |
 |
Pokémon Center Meowth | |
|
Sleeping Pikachu | |
 |
Pokémon Center Eevee | |
|
Pokémon Center Yokohama Pikachu | |
| Platinum exclusive (Japanese) | ||
|---|---|---|
| Pokémon | Event | Notes |
|
2008 TCG World Championships Milotic | |
| Diamond and Pearl exclusive (Japanese) | ||
|---|---|---|
| Pokémon | Event | Notes |
 |
2008 Tanabata Jirachi | |
 |
2008 World Championships Lucario | |
 |
2007 Birthday Charmander 2008 Birthday Charmander | |
 |
Cinema Shaymin | |
 |
Movie Regigigas | |
 |
McDonald's Pikachu | |
 |
Strongest Pokémon | |
 |
||
 |
||
 |
||
 |
||
 |
Golgo Octillery | |
 |
PalCity Manaphy | |
|
PalCity Lucario | |
 |
PalCity Mew | |
 |
Cinema Darkrai | |
 |
10th Movie Deoxys | |
 |
Yamamoto Whiscash | |
 |
Shokotan Tropius | |
|
World Hobby Fair Manaphy | |
 |
Concert Chatot | |
 |
Pokémon Festa 2006 Pokémon | Pearl exclusive |
 |
Diamond exclusive | |
3.2. Cute Charm glitch.
The Cute Charm ability makes it more likely to find a wild Pokémon of the opposite gender of the user. In the Generation 4 games, it does so by forcing the personality value to be set to one out of 25 possible values (one per nature). This modification affects other things that are also determined using the personality value.
The Shiny odds are usually 1/8192 during normal conditions, but due to the way this ability works, it depends on how many out of those 25 possible values result in a Shiny Pokémon, along with the TID and SID. The lowest chance is 1/24576 (when only 1 out of 25 results in a Shiny), while the highest one is 21.34% (8 out of 25). This only applies if the Pokémon can be affected by Cute Charm (not a male-only, female-only, or genderless species).
With the right TID and SID, Shiny Pokémon become something trivial, to the point of making them lose most, if not all, of their value. The most important thing to mention about this ability is the fact that no matter what, it has a chance to mess up your odds, so it’s better not to use it to begin with. This goes for anyone who was planning on hunting Combee with it.
3.3. Manaphy egg.
Manaphy is considered one of the toughest hunts to do, both for the length of its resets and the amount of mental energy you need to put into it (compared, for example, to effortless reset hunts where you only need to spam A). Obtaining a Manaphy egg is also not an easy task, as it is only available in the Pokémon Ranger games. All three have access to a special mission that, once completed, lets you transfer a Manaphy egg to the Generation 4 games. These missions are obtained through the Ranger Net.
-
The international releases of Pokémon Ranger have the Ranger Net missions included in the game (in Japan they had to be downloaded), which can be unlocked through a password. The password can be entered by pressing R + X + Left inside the Ranger Net.
Version Password UK Mg35-Cpb8-4FW8 Spanish C58f-t3WT-Vn7 Italian FH38-fwD8-5S2a German R3d4-cv2S-WC7W French DY4g-k28S-QB9F American P8M2-9D6F-43H7 The missions must be completed in order to unlock the next one.
-
In both Pokémon Ranger Shadows of Almia and Guardian Signs, the Manaphy mission was released through the internet and is no longer available. The only way to obtain them is through the use of the DNS exploit or other external modifications.
This mission can only transfer one Manaphy egg per cartridge. No matter how many times you restart the save file, it will never have another one available. Sadly, buying multiple copies is the way to go, as long as you want to keep the whole process as legit as possible. Finding a copy with an available egg is just one more annoyance during this hunt.
The first Pokémon Ranger game is the easiest to go for, as it doesn’t require any external help to obtain the mission. Guardian Signs tends to be the most expensive of the three in the second-hand market, so it is advisable to go for Shadows of Almia if the original isn’t available.
For the hunt itself, there are some things that must be highlighted before starting. First, the Manaphy egg will never hatch a Shiny Manaphy in the game it is transferred to from Ranger, due to a lock. In other save files, it can be Shiny, so the whole process involves trading the egg with another game. Second, the Manaphy will never show as Shiny during the hatch screen, so you will have to check your team. Any Manaphy that shows as Shiny during that scene is manipulated and fake. As for preparations before the hunt, you will need:
-
2 Nintendo DS. Any kind, including the 3DS family.
-
2 Generation 4 games. Diamond and Pearl are recommended, as they have shorter resets than Platinum. Heart Gold and Soul Silver are slower than Platinum.
-
1 to 4 Manaphy eggs. The Union Room doesn’t let you trade more than four eggs at once.
After everything is ready, make sure to walk with the eggs a bit until the first one hatches after a few hundred steps (~500). This will make the process faster during the hatching phase. With preparation done, the next thing is the hunt itself.
Make sure to transfer all eggs from Ranger to the same game (“Game A”) and trade them to a game where they can be Shiny (“Game B”). The following steps are best done simultaneously:
| Game A | Game B | |
|---|---|---|
| Step 1 | Reset the game after trading the eggs. Make a new save file (Up + B + Select in the title screen). |
Exit the Union Room and start hatching the Manaphy eggs after receiving them from the other game. The first egg hatches around the time game A is done erasing data. |
| Step 2 | Go through the game’s intro. Set text speed to fast in options. |
Keep walking and hatching. The last egg should hatch after exiting the house in game A. Soft reset after all of them hatch (DO NOT save before resetting). |
| Step 3 | Obtain the starter and mash through the dialogues until you are in front of the Poké Mart. Buy Poké Balls. |
Leave aside until game A is done. |
| Step 4 | Go to Route 201 and catch enough Pokémon until you have 1 for each egg and 2 extra (including the starter). |
|
| Step 5 | Go to the Union Room and trade the eggs. | |
| Step 6 | Repeat from step 1, reversing Game A and B. | |
This process is long, and has multiple chances to find a Shiny Pokémon, which would technically count as phasing. The reset times will get shorter as you get used to your own pace.

Technical information.
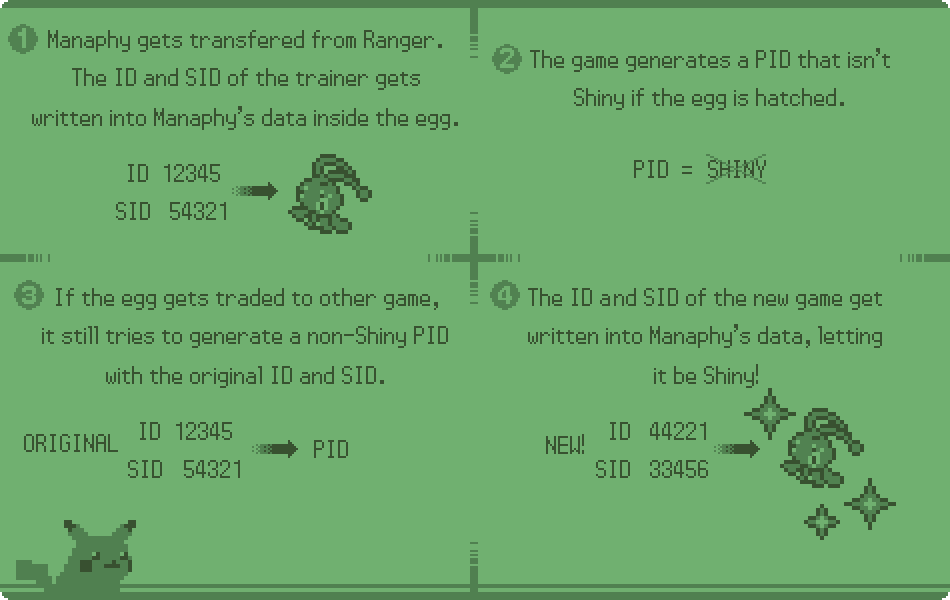
Usually, all Mystery Gift Pokémon have a Shiny-preventing system where a new PID is calculated for the event Pokémon if it were to be Shiny. We can call this process “Shiny check”. This could also be the case for Manaphy, but they made the mistake of releasing it as an egg, which you are able to trade.
Manaphy’s PID is generated as normal, but the Shiny check is called at the moment the egg hatches (if the Pokémon is detected as Manaphy), as many times as needed until the combination of PID, ID, and SID doesn’t result in a Shiny. But there’s a small detail they forgot about: the Shiny check uses the ID and SID of the game where Manaphy was originally transferred to, which is stored in Manaphy’s data. This means that, if you trade the egg to a new game, the new ID and SID get written into the Manaphy after the Shiny check has already finished, giving you a chance for it to be Shiny. To make it simple, here’s a small chart of how it all works:
4. Wii games.
4.1. Pokemon Rumble.
This is the first entry in the Pokémon Rumble series. This game was never released in physical format; instead, it was available as a WiiWare download through the Wii Shop Channel. This is not the only game available this way when it comes to Pokémon.
Pokémon Rumble is different from the mainline games in how it plays: turn-based combat is nonexistent, and it is replaced by a system more common in action RPG games, where everything is more dynamic. All of the Pokémon found in this game are Toy Pokémon, which are wind-up toy versions of regular Pokémon, powered by a Wonder Key. These Pokémon only know two moves at a time, which can be used infinitely without worrying about PP. After one of them has been defeated, they may drop on the floor for the player to pick up and use later on.
Shiny Toy Pokémon can be found through the game with some luck. The shiny odds are believed to be the same as the regular games, but due to the amount of Pokémon you see at the same time through each level, encounters are much faster, and in consequence, may be easier to obtain.
Normal encounters.
Through the levels, you will find multiple groups of enemies that will attack you on sight, which you will have to beat. After their HP is depleted, some of them may drop on the floor to be picked up; this will let you use them to fight later on. There is also a chance that they just leave money after being defeated. Shinies will always be obtainable, so there’s nothing to worry about.
Due to the nature of this game’s gameplay, battles don’t have any animations to go through like the mainline games (fading to black, the Pokémon sliding into the screen, sending out your own Pokémon, running away, etc.), which makes the task of finding a Shiny significantly easier than what we are used to. Think of it like how the shininess can be seen on the overworld in Legends: Arceus or Scarlet and Violet, making the number of encounters skyrocket. After finding a Shiny Pokémon, it will be displayed with all the other Pokémon after beating the level, with its name being blue instead of pink or white.
Aside from the other mechanic differences from the main games, there’s a chance that Toy Pokémon have a chance to have a Special Trait, which are passive abilities that give them a boost. For example, “Healthy” lets the Pokémon recover HP over time, or "Punchy", which increases its attack. This way, if you happen to find a Shiny Toy Pokémon with a trait, it will be even more special!
Bosses.
At the end of each level, there will be a bigger boss Pokémon waiting for you to battle. These are often special Pokémon that are not normally found in other levels, or just legendaries, and are obviously only found once per level.
Shinies in the credits scene.
When the credits start rolling, there’s a sequence where your Pokémon will be standing on a podium, surrounded by multiple other toys, in celebration. The scene will play for a while, spinning the camera around and showing all of the Pokémon. The important thing here is that these Pokémon are random, and so is their Shiny status. This means that they are, in fact, uncatchable, but still something fun to see nonetheless.
Rumble Weekend mod.
The Shiny Pokémon fans have created multiple quest concepts or “community events” where the objective is finding some particular Pokémon, usually through specific methods, types of hunts, or games. One of them is the “Rumble Weekend”, a time for people to gather and hunt in this game together. The reason why this event is mentioned in this guide is due to the existence of a mod of the same name created with hunting in mind. Shinies obtained through game modifications are sometimes not regarded as legit, but this one is significant enough to add it here.
The vanilla Rumble game only includes Pokémon from the first and fourth generations, skipping over the Johto and Hoenn regions and giving a more limited amount of targets than usual. This mod fixes this issue and adds them to the game without touching anything else from the base game. You can find the files and all the information here.
4.2. Pokémon Battle Revolution.
Battle Revolution is a game where the main gameplay is battling in colosseums, sometimes using rental Pokémon and other times your own from your DS games. But the important thing is that these trainers' Pokémon have a small chance to be Shiny. Most of the time, this would result in a failed or uncatchable Shiny, but thanks to the Trade Mode Battle, you can grab their Shiny Pokémon as long as you win, and they send out the Shiny. This Shiny can be kept on your team during the battles.
But this game not only includes normal Shiny Pokémon. There are some special bosses in the game who are wearing costumes of some Pokémon, like, for example, Roserade. These trainers can be beaten, and their costumes can be unlocked afterwards, but here's the thing: these costumes can also be Shiny.
There is a very important process to follow in order to hunt for these clothes:
-
The game must be beaten first in order to unlock Level 50 All in the colosseums.
-
To hunt a costume, you must beat the entire colosseum from the beginning, up to the point where you battle the leader. You MUST NOT have the normal costume unlocked, or you won't be able to obtain the Shiny version.
-
The game can be reset after checking the clothes of the leader.
The colosseums must be battled in "Level 50 All" mode.
| Costume | Colosseum | Leader |
|---|---|---|
 |
Magma Colosseum | Colosseum leader Terrell |
 |
Waterfall Colosseum | Colosseum leader Marina |
 |
Sunset Colosseum | Colosseum leader Dusty |
 |
Main Street Colosseum | Colosseum leader Taylor |
 |
Neon Colosseum | Colosseum leader Rosie |
 |
Crystal Colosseum | Colosseum leader Voldon |
4.3. My Pokémon Ranch.
This WiiWare title had a similar function as Pokémon Box from the GameCube, a storage for all your Pokémon from the main games. You can connect up to 8 Diamond or Pearl games to the Wii and transfer your Pokémon back and forth as long as the original save file they’re from exists (they will be stuck in the ranch if not). The storage will be upgraded as you add more Pokémon, until you reach the maximum amount (1000).
The game will take your Pokédex data and select Pokémon that aren’t registered yet, giving you the quest of finding them. Hayley, the host of the ranch, will sometimes trade you her Pokémon in exchange for these “Wanted Pokémon”. The ones she offers usually come with something that makes them a bit special, like a TM or egg move. The downside to this is that they cannot be Shiny, including Phione (obtainable when 250 Pokémon are on the ranch) and Mew (obtainable at 999). On the other hand, if you happen to deposit a Shiny Pokémon into the ranch, they will appear with these different colours, as expected.
An update to include all the new content from Platinum and other expansions (able to have up to 1500 Pokémon in the ranch) was released in Japan, but never anywhere else, so only Diamond and Pearl could be used to connect with the ranch in other regions.
4.4. Pokémon Mystery Dungeon: Adventure Team.
Fan translation.
Although the game was only released in Japan, some fans have worked on an English translation, so it is more accessible to non-Japanese-speaking players. This version can be played both in an emulator and on a homebrewed Wii. The files can be found here. It is recommended to read the “readme.txt” file to learn more about the patches, instructions, FAQs, and other additional information. It should cover enough things to put you on the way to being able to play this version, although other tutorials may exist on the internet.
Shiny Pokémon and their perk.
Shiny Pokémon in this game have the same odds of appearing in a dungeon as in the main series games. Although Shiny Pokémon don’t have any unusual advantages in the main games, this is different in Pokémon Mystery Dungeon: Adventure Team. Instead of the normal amount of 100 belly, Shiny Pokémon have a whopping 200.
List of Shiny Pokémon.
| Stage 1 | Stage 2 | Stage 3 |
|---|---|---|
 |
 |
 |
 |
 |
- |
 |
 |
- |
 |
 |
- |
 |
 |
- |
 |
 |
 |
 |
 |
 |
 |
 |
- |
 |
- | - |
 |
 |
- |
 |
 |
- |
 |
 |
 |
 |
 |
|
 |
 |
 |
 |
 |
- |
 |
 |
- |
Recruitment and boosts.
There are multiple things you can use in your favour to be able to recruit Pokémon easier, starting with the level of your own Pokémon. Having a level 99-100 Pokémon will give you a +24.5% boost to the recruitment rate.
Another useful boost is having the “Fast Friend” IQ skill. This skill is available for all Pokémon in the B and H IQ groups and is unlocked at 550 IQ points. To increase the IQ of a Pokémon, you can feed them Gummies (especially those that match their type, or the Wonder Gummy), Nectar, or Gravelyrock (only for Bonsly and Sudowoodo). They can also hold the IQ Booster to get IQ points on certain floors. The Fast Friend recruitment boost is currently assumed to be the same as in Explorers of Sky, which is +5%.
The last thing you can do to boost the recruitment rate is give the leader a Friend Bow or a Golden Mask. These items will also increase the chance of the opposing Pokémon becoming friendly. The percentage is also assumed to be the same as in Explorers of Sky, being +5% for the Friend Bow and +20.1% for the Golden Mask. The Golden Mask is always preferred over the Friend Bow.
If you use all of these boosts at the same time, you will end up with a bonus of +49.6% on any recruitment rate.
Save files compatibility.
This iteration of the Pokémon Mystery Dungeon series has three different entries: Blazing Adventure Squad, Stormy Adventure Squad, and Light Adventure Squad. Each of these games has its own exclusive dungeons and Pokémon, but luckily the save file is shared between all versions. This means that you won’t be locked out of any exclusive content if you have all three. The following list shows in which game each shiny appears.
| Blazing / Wildfire | Stormy / Tempest | Light / Radiant |
|---|---|---|
| Tentacool, Tentacruel | Hoothoot, Noctowl | Skorupi, Drapion |
| Voltorb, Electrode | Hoppip, Jumpluff | |
| Magikarp, Gyarados | Slugma, Magcargo | |
| Zigzagoon, Linoone | ||
| Budew, Roselia, Roserade | ||
| Barboach, Whiscash |